Showing posts with label survival. Show all posts

Tuesday, May 16, 2017

Car Window Hammer - May Idea of the Month

Instead of buying an expensive car window safety hammer (used to break a car window in case of an emergency) you can buy a welders chipping hammer (used for chipping slag off of welds) for around 5 dollars and up.
When you watch REAL safety hammer testing on YouTube a lot of those safety hammers don't work very well. To break glass effectively you need a good sharp point and some steel behind it.
That is why a 5 dollar chipping hammer works so much better.

-----------------Traditional Car Window Safety Hammer Vs. Welders Chipping Hammer --------------------
You will also want to have something for cutting a stuck seat belt. For this you can't beat a good pair of scissors. Put the chipping hammer, scissors, and a pair of leather gloves in a safe but easy spot to get to in your car.
There are a lot of videos on YouTube of people leaving kids and pets in hot cars and people having to break glass to get them out. Having tools like this will make this a lot easier.


Thursday, March 16, 2017

Redneck Vacuum Sealing - March Idea of the Month

Freezing is a very common and useful way to preserve food.
Before putting food in a Ziploc bag and throwing it into the freezer (or fridge),
vacuum seal it to extend the shelf life.
There are many ways that this can be done,
but I find my method to be simple, cheap, and efficient.

How to:
Put food into a Ziploc bag.
Insert a straw into the bag and then seal it up to the point of the straw.


Use your mouth to draw the remaining air out of the bag.
While still sucking, pull the straw out and quickly zip up the bag the rest of the way.


Monday, December 12, 2016

Medical Equipment - December Idea of the Month

Most communities don't have the medical capabilities to handle large scale disasters. There are just too many people. So for your church group, preparedness group, or large family it is a really good idea to have at least one set of basic medical testing equipment. When a disaster hits you will possibly have a doctor or nurse in your area, but they will need some of those basic tools to diagnose the sick and injured. A lot of doctors and nurses won't have those tools in their homes. Here is a list of basic testing equipment that you will want to have. All of these items can be bought online. Keep in mind that you will still need first aid supplies to go with it.

  • Stethoscope
  • Otoscope (for ears)
  • Thermometer
  • Pulse Oximeter (for monitoring a person's oxygen saturation)
  • Glucometer including appropriate strips and lancets (for blood sugar)
  • Blood pressure cuffs
  • Reflex hammer
  • Tongue depressors, preferably wrapped.
  • Flashlight
  • Masks, Gloves
  • Alcohol wipes
  • Lubricating jelly
  • Alcohol gel for hands


Wednesday, July 13, 2016

Survival Cache - July Idea of the Month

_______________________________________________________________________________
Survival Cache                                                                          [kash]
             (noun)
A buried or hidden container that is filled with supplies that can be accessed when needed.
Often placed on someone’s property hidden via burying. They are also placed along evacuation/bug out routes to be accessed when needed during traveling.
_______________________________________________________________________________

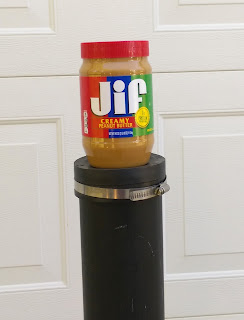
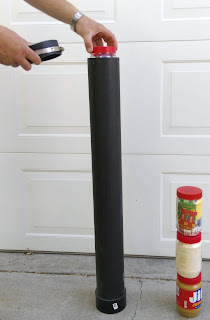
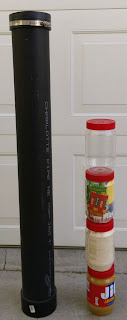
This survival cache is a perfect way to store needed items in a safe, hidden location. These can be accessed at any time but mainly used for natural disaster situations. Some of the things I put in mine are ammo, dried food, water purifying tablets, medication, a good pocket knife, flint and steel, solar blanket, rope, an empty soup can for boiling water, etc. If for some reason you lost everything and you had a cache somewhere you would have access to some basics with a long shelf life. I have a couple buried. One at the corner of a shed at a friend's house and one on another property. They seal real well since this pipe is made to go into the ground and not leak. You can buy the 4 inch ABS pipe and parts at Home Depot or Lowe's or a plumbing store.

Survival Cache for Emergency Situations

Supplies needed (makes 1 cache):
• 4 inch diameter ABS plastic pipe [you choose length]
• ABS glue
• ABS 4 inch cap [to glue on bottom]
• ABS 4 inch cap [removable to make the top]
• Flathead screwdriver
• Empty 40 oz. Jif peanut butter plastic jars {Note: I’ve found these work perfectly - flat on top and bottom for stacking, they seal real well, good for a second barrier, not too tight or too loose in the 4 inch pipe, they keep things separated, and you have extra containers for water or whatever things you need }
 How to:
1. Glue a cap on one end of the pipe
2. Fill jars with your survival products
3. Put top cap on (the removable one) and
    tighten with a screwdriver
4. Bury in a safe location. I like to bury them
   vertical, but some like horizontal; it is your preference.

Survival Cache assemblySurvival Cache Containers

I like digging a vertical hole a little bigger than the pipe. Then I set the pipe in the hole and stuff some foam around it to fill the hole. Then I have a small piece of plywood about 12x12 inch that I recess into the soil on top of the hole about 8 inches. I then put dirt on top of plywood so I don't have to dig much to get it out. In an emergency I would dig it up and take the whole thing with me. I could use the pipe for an extra container or something.
I hope this cheap, redneck emergency preparedness idea is useful for you!


Tuesday, November 24, 2015

Last Resort All-In-One Tent/Stove/Cooker

A few years ago I had an idea on how to make a lightweight, cheap survival tent/stove/cooker. A good tent with a wood stove is a ton of money so I came up with this idea to create a shelter with heat inside that you can also use to cook. It only cost me about 30 dollars or so. Now people that can’t afford much but want to be prepared still can be at a low, low cost. It is not as nice as a 2000 dollar set up but it works very well. I have tried it in the winter.
I have been changing designs trying to make it better. The first three pictures are the old design. The last two are the new.
 
 
These are two 4 inch stove pipes with a ring welded towards the top to hold a tarp up. The base is a short pipe with expanded metal welded onto the bottom and 2 steel stakes welded onto the sides. This design is 3 separate pieces, 2 chimney pipes and the bottom bracket that all slide together.
 

The tarp has a stove jack in the center of the tarp. The stove jack was made by cutting a 6 inch hole in the tarp, gluing a silicon hot pad onto the tarp, then cutting a 4 inch hole in the hot pad. The tarp is your tent. The heat from the stove in the middle is what heats your tent.


The top of the chimney has a pot skirt (coffee can) and a pot for cooking. The design is like a rocket stove where the cooking is done with the heat of the exhaust.
 
To light a fire, first drop some paper down the chimney followed by a small amount of fuel (briquettes, wood, etc.) and light it through the metal mesh at the bottom of the pipe.
(12-15 briquettes for the 4 inch (old design) was about right)
 
 
This is the new design. It is 6 inch tubing about 50 inches tall, expanded metal welded onto the bottom , 2 stakes welded onto the sides of the bottom, 2 handles welded on the sides of the pipe, a ring welded towards the top (in order to hold up the tarp).
 
Also, I found that the briquette chimney turned upside-down and placed on top of the chimney pipe can work as a pot skirt for a cooking pot.


The advantages of the new design are:
  • Easier to construct because there is one piece instead of three.
  • 6 inch pipe can hold more fuel than 4 inch pipe, and get a warmer fire.
  • The handles on the pipe allow you to push the stove right into the earth, compared to having to use a hammer to stake down the pipe like in the old design.
 
The advantages of the old design are:
  • Weighs 6 pounds compared to 20 pounds
  • Can compact for transportation if needed


Saturday, October 31, 2015

Reader Question

Nancy asked: Ryan, What is the best way to start a fire in a survival situation ?


Nancy,

Thank you for your comment! There are many fire starter ideas out there for starting fires but in really wet conditions I like using a road flare (see picture below). You can buy them at any auto parts store. It burns really hot for a long time and, if your wood is wet, it will dry it out and then start to burn. Let me know if you have any more questions!!

-Ryan