Hi everyone! Here is a brief video of our booth at the recent preparedness fair. Pictures are coming soon! If you want detailed information about anything you see in this video please let me know. Thanks!!
Showing posts with label Food. Show all posts
Showing posts with label Food. Show all posts
Tuesday, October 9, 2018

Wednesday, August 30, 2017
The Perfect Refrigerator - August Idea of the Month
Most refrigerators are set at around 36 to 40 degrees, but the perfect temperature is right at 32 degrees. However, if you were to set your refrigerator at 32 degrees, the temperature would fluctuate enough that you would most likely end up freezing some foods. This is why most people tend to set their refrigerator temperatures slightly higher so that things stay cold, but not frozen.
If in an emergency, and ice is available, you can actually make a perfect refrigerator. Make this by putting clean ice in a cooler. Then, fill cooler with clean water to the point where it barely covers the ice. Now, put food items in the ice bath in a sealed container.
Make sure to use clean ice and clean water (do not add salt, it changes freezing temperature of water)
This ice water bath keeps food right at 32 degrees but won't freeze it, and provides a longer shelf life to the foods because of colder temperatures.
If you'd like to know the science behind this concept, check this out:
Thursday, March 16, 2017
Redneck Vacuum Sealing - March Idea of the Month
Freezing is a very common and useful way to preserve food.
Before putting food in a Ziploc bag and throwing it into the freezer (or fridge),
Before putting food in a Ziploc bag and throwing it into the freezer (or fridge),
vacuum seal it to extend the shelf life.
There are many ways that this can be done,
but I find my method to be simple, cheap, and efficient.
How to:
Put food into a Ziploc bag.
How to:
Put food into a Ziploc bag.
Insert a straw into the bag and then seal it up to the point of the straw.

Use your mouth to draw the remaining air out of the bag.
While still sucking, pull the straw out and quickly zip up the bag the rest of the way.

Tuesday, February 28, 2017
Atmit - February Idea of the Month
What is atmit?
“Atmit is a nutritional supplement used to fight famine in impoverished countries. The creamy, nutritious food is indigenous to Ethiopia and is now used to feed the severely malnourished and weakened adults and children. The word atmit originated in Ethiopia and refers to a kind of "thin, nourishing porridge”
My family loves my version of this recipe.
We often eat it for breakfast and make homemade “survival bars” for snacks.
Atmit
- 3 cups oat flour (you can make this by simply dry blending rolled oats in a blender until it is a powder)
- 1 ½ cups powdered milk
- ¾ to 1 cup sugar
Directions:
This recipe can be made many different ways. If someone hasn’t eaten for a few days,
then a thin, runny consistency helps to ease their body back into eating food.
My kids like it thicker—some of them even like it with a bit of milk.
With this in mind, the three ingredients up above are added to boiling water (very similar to making oatmeal or other such breakfast foods). The amount of water varies because of preferred thicknesses.
Atmit survival bars
- Dry atmit mix
- Peanut butter
Directions:
Add small amounts of peanut butter to atmit mix
and stir until you can mold it in your hand without being sticky
Note: additional ingredients of your choice can be added
such as mini chocolate chips, or shredded coconut etc.
Monday, November 28, 2016
Emergency Irrigation - November Idea of the Month

In an emergency situation, oftentimes you don’t have all of the parts and pieces that you need to build things and access to these parts would be difficult at best.
So thinking outside of the box can really pay off.
PVC Pipe Emergency Drip-irrigation for Garden
Materials needed:
• Heat source (hot coals from a waning fire, briquettes, etc.)
• PVC pipe (I use 3/4”, but any size will work)
• 5 gallon plastic bucket
• Hack saw
• Cotton rags
Directions-
1. Making the point: Take the PVC pipe and the hack saw, cut four slits about 3” long in one end of the pipe. Heat the pipe until soft and mold it tapering to a point (as shown). Let cool and file off excess edges.

2. Making the pipe-stop: Take the other end of that same PVC pipe and cut four slits down about 1” deep, then heat until soft. Smash onto a flat, hard surface so that the end flares outward. Hold until it cools.

This is the finished product:

3. Hole in bucket: Drill a 5/16” hole towards the bottom of the bucket. Then heat the area around the hole until soft. Then take the PVC pipe point that you made earlier and push the point through the small hole from the inside of the bucket. Note: This photo shows only a small part of a bucket purely for demonstrative purposes. You would use the whole bucket to hold the water for the irrigation process.


4. Cutting the point off: The point is used to aid in inserting the pipe through the small hole; but also to form a sealing shoulder on the bucket (as shown here).

Once the pipe has been pushed all the way through to the stop, the point is no longer needed. Cut it off. You will be attaching the rest of the pipes to this first pipe.


5. Making the bell: Take a regular piece of PVC pipe and heat approximately 1” of the end until soft. Then take another pipe and shove it into the soft end of the heated pipe, let cool and then you can pull the second pipe out. This makes a bell-shaped connection so that pipes can be easily connected together.


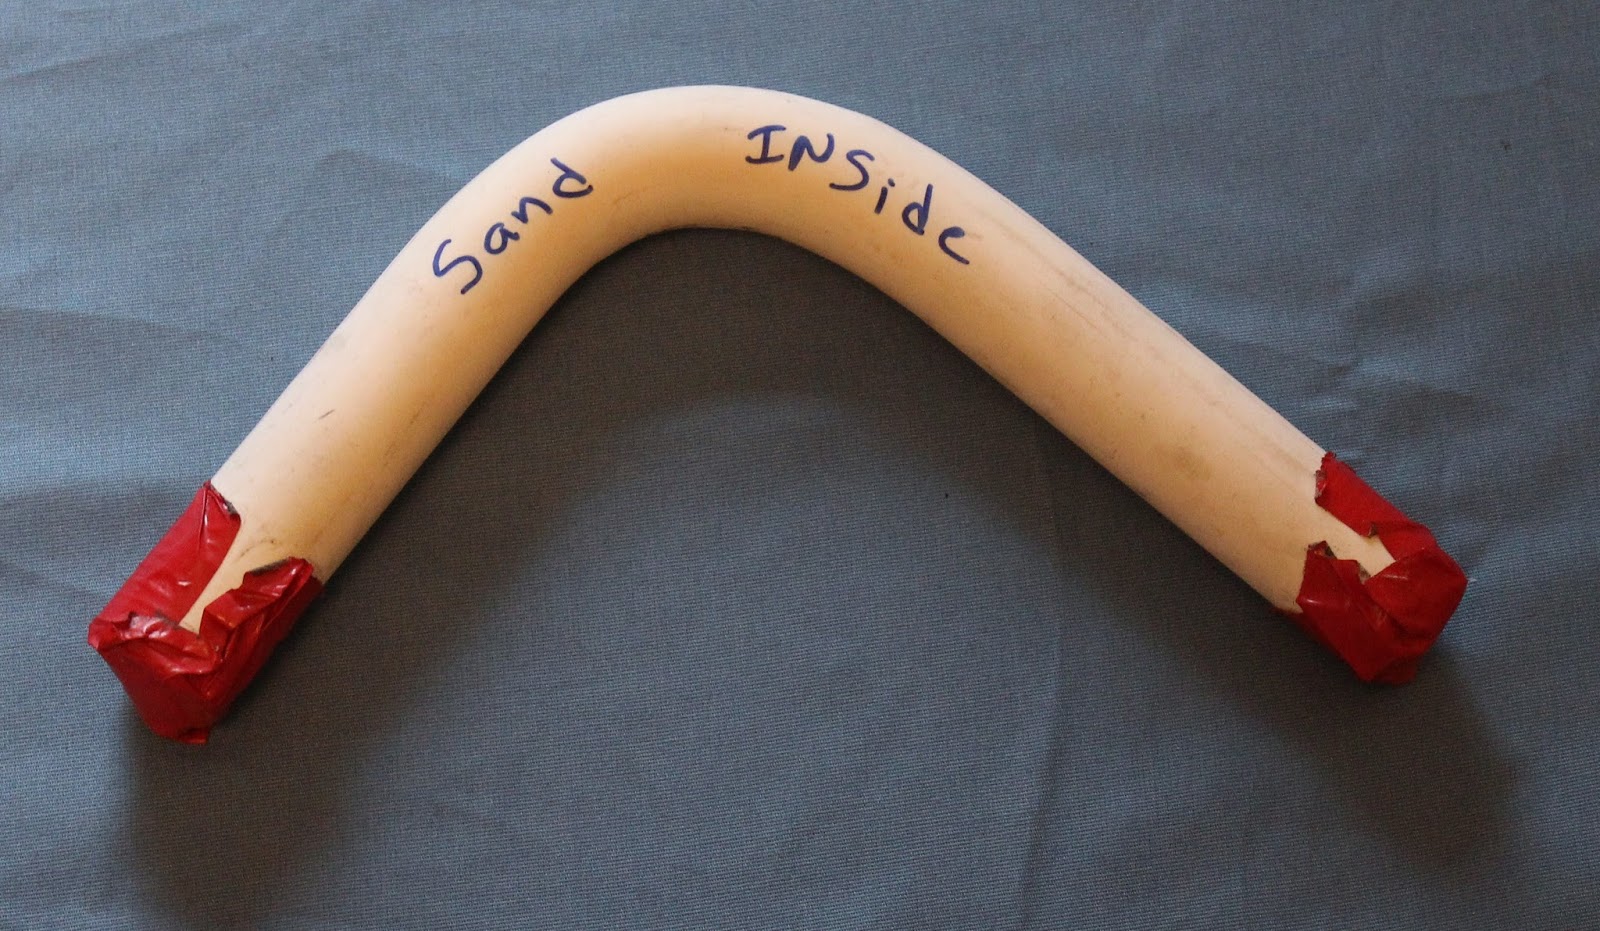
6. Making elbows (if needed): You may need to make an elbow if you need your makeshift irrigation system to turn a corner. To do this, you need to take a short piece of pipe and put duct tape on one end, then fill the pipe with sand, and then tape the other end shut. Heat the middle of the pipe and then bend it to your desired angle. Once it cools, dump the sand out.
7. Drip pipe: Wherever there is a plant, drill 3/8” holes clear through the pipe. Take a short piece of a cotton rag and roll it to fill the hole with a small amount hanging over both sides.


8. Assembly: Your five gallon bucket holding the dirty water needs to be sitting on something two or three feet in the air so that gravity will feed the water through the pipe. Use cinderblocks or an upside down barrel etc. Start connecting your pipes to the pipe coming out of the bucket and run the pipe alongside the plants. Start drilling holes wherever the plants are and stuff the rags into the holes (The reason why regular drip nozzles won’t work is that they plug with dirty water). At the very end of your system, plug the pipe with something or heat it and smash it until cool. Fill the bucket with water as needed and watch your plants grow.
Afterthought: If you do have steel pipe and desire to connect to the plastic pipes, heat the metal pipe for about 10-15 seconds, shove the metal pipe inside the plastic pipe, and cinch down with a hose clamp on the joint to embed the threads of the steel pipe into the plastic pipe. You can take the hose clamp off once it cools. This also works using plastic bottles if you desire to use them for a funnel or to connect another type of container to your piping system.

Wednesday, July 13, 2016
Survival Cache - July Idea of the Month
_______________________________________________________________________________
Survival Cache [kash]
(noun)
A buried or hidden container that is filled with supplies that can be accessed when needed.
Often placed on someone’s property hidden via burying. They are also placed along evacuation/bug out routes to be accessed when needed during traveling.
_______________________________________________________________________________
Often placed on someone’s property hidden via burying. They are also placed along evacuation/bug out routes to be accessed when needed during traveling.
_______________________________________________________________________________
This survival cache is a perfect way to store needed items in a safe, hidden location. These can be accessed at any time but mainly used for natural disaster situations. Some of the things I put in mine are ammo, dried food, water purifying tablets, medication, a good pocket knife, flint and steel, solar blanket, rope, an empty soup can for boiling water, etc. If for some reason you lost everything and you had a cache somewhere you would have access to some basics with a long shelf life. I have a couple buried. One at the corner of a shed at a friend's house and one on another property. They seal real well since this pipe is made to go into the ground and not leak. You can buy the 4 inch ABS pipe and parts at Home Depot or Lowe's or a plumbing store.

Supplies needed (makes 1 cache):
• 4 inch diameter ABS plastic pipe [you choose length]
• ABS glue
• ABS 4 inch cap [to glue on bottom]
• ABS 4 inch cap [removable to make the top]
• Flathead screwdriver
• Empty 40 oz. Jif peanut butter plastic jars {Note: I’ve found these work perfectly - flat on top and bottom for stacking, they seal real well, good for a second barrier, not too tight or too loose in the 4 inch pipe, they keep things separated, and you have extra containers for water or whatever things you need }
How to:
1. Glue a cap on one end of the pipe
2. Fill jars with your survival products
3. Put top cap on (the removable one) and
tighten with a screwdriver
4. Bury in a safe location. I like to bury them
vertical, but some like horizontal; it is your preference.


I like digging a vertical hole a little bigger than the pipe. Then I set the pipe in the hole and stuff some foam around it to fill the hole. Then I have a small piece of plywood about 12x12 inch that I recess into the soil on top of the hole about 8 inches. I then put dirt on top of plywood so I don't have to dig much to get it out. In an emergency I would dig it up and take the whole thing with me. I could use the pipe for an extra container or something.
I hope this cheap, redneck emergency preparedness idea is useful for you!
Monday, June 6, 2016
Easy Soup Base - June Idea of the Month
After a natural disaster or during an emergency situation, food can be scarce.
Knowing how to make the small amount of food you might have available,
into something good to eat is essential.
For an easy soup base take a gravy packet and double the water that it calls for.
We like McCormick gravy, it calls for 2 cups cold water so we add 4 cups of water (if you like the soup thicker: only add 3 cups of water to 1 McCormick’s gravy packet).
Knowing how to make the small amount of food you might have available,
into something good to eat is essential.
For an easy soup base take a gravy packet and double the water that it calls for.
We like McCormick gravy, it calls for 2 cups cold water so we add 4 cups of water (if you like the soup thicker: only add 3 cups of water to 1 McCormick’s gravy packet).


This soup is really great and very easy to make! Try it!

Friday, May 20, 2016
Chicken Cooker - May Idea of the Month
Chicken Cooker
Making slow-cooked, smoked meat/potato wedges etc. is nearly effortless with this method of cooking.
Meadow Creek, a barbecue website, crafts chicken cookers that make it possible to easily cook incredibly delicious chicken
I decided to make a small version of their type of cooker for everyday home use and camping. It worked really well!
The concept:
· The steel box encases the contents (briquettes, grates, food items). This serves to keep
heat inside the cooker and speed up the cooking process.
· The food is heated by briquettes in the bottom of the box. Note: DO NOT use briquettes
with lighter fluid, use only plain briquettes. A briquette chimney is used to initially heat
these.
· Small vent holes feed briquettes oxygen, but you must be careful to not give it too much
oxygen or your chicken will burn. I put six quarter-inch holes on the sides close to the
bottom of the box.
· The meat is sandwiched between two grates
· The distance of the two grates is 18 inches from the briquettes (this measurement is very
important!)
My box is 16x16 x22 H. The two racks are hinged together on one side.
I used an oven rack [the kind with the bars close together, then I cut it to the size I needed]. I used a slip ring ( just 2 little pipes welded together ) to hold the rack together but you could use wire or a hose clamp etc. I made the box by welding cut steel together. You could use 2 oven racks and some cinder blocks if you couldn't weld. You just need some type of fireproof box.

1. Obtain a 7 lbs pack of bone-in chicken, I prefer thighs. Lay them on one rack and close other rack on top of them, clamp the non-hinge side. This makes a “sandwich”, season both sides with your choice of spices.

2. Light two chimney’s worth of briquettes
3. After 30 minutes, dump them in the bottom of box/cooker.
4. Level the briquettes out with a shovel
5. Set rack of preloaded chicken in slots (located at the top of the cooker)


6. Shut the lid of the cooker
7. For crispy chicken: Flip every 10 minutes for an hour and twenty minutes

8. For less crispy chicken (regular): Flip every 10 minutes for an hour and ten minutes
9. Remove chicken grates from cooker, set in a safe place

Once the chicken is done, there is plenty of heat left over in the bottom of the cooker for use in Dutch oven cooking, or for cooking baked potatoes etc.
Tuesday, December 15, 2015
Monday, November 9, 2015
Congee
Congee is an Asian recipe using rice that is
over boiled to feed a lot of people with a small amount of rice. This is a good
recipe to use in an emergency because it makes your food supply last longer.
It is filling and quite tasty!
Congee:
9 cups water
¾ cup of rice
1 Tablespoon of salt
1. Slow boil with lid on for 1 ½ hours
2. When done, add whatever else you’d like to it, such
as a can of chili, or hamburger and corn etc.
Subscribe to:
Posts (Atom)