Tuesday, January 19, 2016

Carbon Monoxide (CO) Can Kill

Carbon monoxide (CO) is produced when a fuel such as charcoal, gas or petrol burns incompletely.
 
This could be because an appliance isn’t working properly or might simply happen as part of its normal function. Barbecues, for example, produce carbon monoxide even when they are working well.
 
Carbon monoxide is a colourless, odourless gas and is poisonous. In high concentrations it can kill swiftly. In smaller concentrations CO poisoning can give symptoms similar to flu or food poisoning. Look out for headaches, nausea and vomiting, dizziness, drowsiness and weakness - but the best advice is to avoid any chance of being poisoned in the first place.
 
Be careful when burning any type of fuels in an emergency.
Having a battery operated CO detector can be a life saver.


Thursday, January 7, 2016

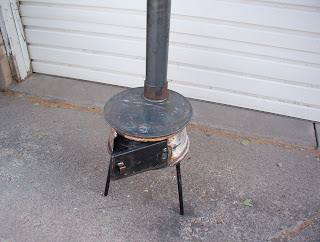
Tire Rim Stove - January Idea of the Month

Cooking and heating in emergency situations is very important. If you don't have the means to purchase a stove or propane to store for emergencies or if a disaster has already happened and you are scrambling for something, here is another option.
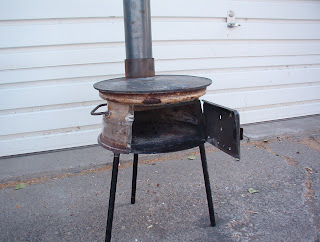
You can make a small wood stove from a 16 inch truck tire rim and whatever other metal pieces you can find.  
*Some welding is required*
Cut the center out of the tire rim.
Weld a round steel plate to the top and bottom of the rim
Add metal legs to the bottom.
Cut the door out of the side of the rim.
You can use the piece you cut out or a different piece of metal for the door. 
Add hinges and a handle to the door piece. 
Cut a hole in the top and add the exhaust pipe.
       There you have a stove you can use for heating your shelter.
Tire Rim Stove

Emergency Heating Option


Tuesday, November 24, 2015

Last Resort All-In-One Tent/Stove/Cooker

A few years ago I had an idea on how to make a lightweight, cheap survival tent/stove/cooker. A good tent with a wood stove is a ton of money so I came up with this idea to create a shelter with heat inside that you can also use to cook. It only cost me about 30 dollars or so. Now people that can’t afford much but want to be prepared still can be at a low, low cost. It is not as nice as a 2000 dollar set up but it works very well. I have tried it in the winter.
I have been changing designs trying to make it better. The first three pictures are the old design. The last two are the new.
 
 
These are two 4 inch stove pipes with a ring welded towards the top to hold a tarp up. The base is a short pipe with expanded metal welded onto the bottom and 2 steel stakes welded onto the sides. This design is 3 separate pieces, 2 chimney pipes and the bottom bracket that all slide together.
 

The tarp has a stove jack in the center of the tarp. The stove jack was made by cutting a 6 inch hole in the tarp, gluing a silicon hot pad onto the tarp, then cutting a 4 inch hole in the hot pad. The tarp is your tent. The heat from the stove in the middle is what heats your tent.


The top of the chimney has a pot skirt (coffee can) and a pot for cooking. The design is like a rocket stove where the cooking is done with the heat of the exhaust.
 
To light a fire, first drop some paper down the chimney followed by a small amount of fuel (briquettes, wood, etc.) and light it through the metal mesh at the bottom of the pipe.
(12-15 briquettes for the 4 inch (old design) was about right)
 
 
This is the new design. It is 6 inch tubing about 50 inches tall, expanded metal welded onto the bottom , 2 stakes welded onto the sides of the bottom, 2 handles welded on the sides of the pipe, a ring welded towards the top (in order to hold up the tarp).
 
Also, I found that the briquette chimney turned upside-down and placed on top of the chimney pipe can work as a pot skirt for a cooking pot.


The advantages of the new design are:
  • Easier to construct because there is one piece instead of three.
  • 6 inch pipe can hold more fuel than 4 inch pipe, and get a warmer fire.
  • The handles on the pipe allow you to push the stove right into the earth, compared to having to use a hammer to stake down the pipe like in the old design.
 
The advantages of the old design are:
  • Weighs 6 pounds compared to 20 pounds
  • Can compact for transportation if needed


Saturday, November 21, 2015

Let There Be Light - November Idea of the Month

Having a source of light can be helpful in so many ways during an emergency situation. You need light to see for cooking, cleaning, safety, medical situations, and to alleviate fear. Light sticks are inexpensive option and small enough to store easily. Small lanterns are also great.
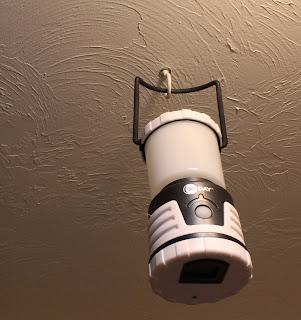
Since I had white ceilings, I bought white hooks and installed one in every room of the house. Now when the power goes out, I can hang a light stick or a lantern off the hook. Typically light sticks illuminate 10-12 hours, so in a power outage, they make great night lights.
*When your light source is higher in the air, it disperses the light more evenly*
Hanging Light Stick
 Hanging Lantern


Monday, November 9, 2015

Congee

Congee is an Asian recipe using rice that is over boiled to feed a lot of people with a small amount of rice. This is a good recipe to use in an emergency because it makes your food supply last longer.
It is filling and quite tasty! 
Congee:

9 cups water

¾ cup of rice

1 Tablespoon of salt


1. Slow boil with lid on for 1 ½ hours
2. When done, add whatever else you’d like to it, such as a can of chili, or hamburger and corn etc.


Security Tips

Warning!
In a major disaster:
Your #1 asset is people.
Your #1 risk is people.