Monday, December 12, 2016

Medical Equipment - December Idea of the Month

Most communities don't have the medical capabilities to handle large scale disasters. There are just too many people. So for your church group, preparedness group, or large family it is a really good idea to have at least one set of basic medical testing equipment. When a disaster hits you will possibly have a doctor or nurse in your area, but they will need some of those basic tools to diagnose the sick and injured. A lot of doctors and nurses won't have those tools in their homes. Here is a list of basic testing equipment that you will want to have. All of these items can be bought online. Keep in mind that you will still need first aid supplies to go with it.

  • Stethoscope
  • Otoscope (for ears)
  • Thermometer
  • Pulse Oximeter (for monitoring a person's oxygen saturation)
  • Glucometer including appropriate strips and lancets (for blood sugar)
  • Blood pressure cuffs
  • Reflex hammer
  • Tongue depressors, preferably wrapped.
  • Flashlight
  • Masks, Gloves
  • Alcohol wipes
  • Lubricating jelly
  • Alcohol gel for hands


Monday, November 28, 2016

Emergency Irrigation - November Idea of the Month

Src: Playing with Brushes from Flickr
 
In an emergency situation, oftentimes you don’t have all of the parts and pieces that you need to build things and access to these parts would be difficult at best.
So thinking outside of the box can really pay off.
 
PVC Pipe Emergency Drip-irrigation for Garden

Materials needed:
• Heat source (hot coals from a waning fire, briquettes, etc.)
• PVC pipe (I use 3/4”, but any size will work)
• 5 gallon plastic bucket
• Hack saw
• Cotton rags

Directions-
1. Making the point: Take the PVC pipe and the hack saw, cut four slits about 3” long in one end of the pipe. Heat the pipe until soft and mold it tapering to a point (as shown). Let cool and file off excess edges.

 
2. Making the pipe-stop: Take the other end of that same PVC pipe and cut four slits down about 1” deep, then heat until soft. Smash onto a flat, hard surface so that the end flares outward. Hold until it cools.
 

This is the finished product:


3. Hole in bucket: Drill a 5/16” hole towards the bottom of the bucket. Then heat the area around the hole until soft. Then take the PVC pipe point that you made earlier and push the point through the small hole from the inside of the bucket. Note: This photo shows only a small part of a bucket purely for demonstrative purposes. You would use the whole bucket to hold the water for the irrigation process.


4. Cutting the point off: The point is used to aid in inserting the pipe through the small hole; but also to form a sealing shoulder on the bucket (as shown here).


Once the pipe has been pushed all the way through to the stop, the point is no longer needed. Cut it off. You will be attaching the rest of the pipes to this first pipe.


5. Making the bell: Take a regular piece of PVC pipe and heat approximately 1” of the end until soft. Then take another pipe and shove it into the soft end of the heated pipe, let cool and then you can pull the second pipe out. This makes a bell-shaped connection so that pipes can be easily connected together.


6. Making elbows (if needed): You may need to make an elbow if you need your makeshift irrigation system to turn a corner. To do this, you need to take a short piece of pipe and put duct tape on one end, then fill the pipe with sand, and then tape the other end shut. Heat the middle of the pipe and then bend it to your desired angle. Once it cools, dump the sand out.


7. Drip pipe: Wherever there is a plant, drill 3/8” holes clear through the pipe. Take a short piece of a cotton rag and roll it to fill the hole with a small amount hanging over both sides.


8. Assembly: Your five gallon bucket holding the dirty water needs to be sitting on something two or three feet in the air so that gravity will feed the water through the pipe. Use cinderblocks or an upside down barrel etc. Start connecting your pipes to the pipe coming out of the bucket and run the pipe alongside the plants. Start drilling holes wherever the plants are and stuff the rags into the holes (The reason why regular drip nozzles won’t work is that they plug with dirty water). At the very end of your system, plug the pipe with something or heat it and smash it until cool. Fill the bucket with water as needed and watch your plants grow.

Afterthought: If you do have steel pipe and desire to connect to the plastic pipes, heat the metal pipe for about 10-15 seconds, shove the metal pipe inside the plastic pipe, and cinch down with a hose clamp on the joint to embed the threads of the steel pipe into the plastic pipe. You can take the hose clamp off once it cools. This also works using plastic bottles if you desire to use them for a funnel or to connect another type of container to your piping system.


Monday, October 10, 2016

Polyester Water Filter


This is an inexpensive, light weight filter for your emergency backpack. It is to be used to filter water before you boil it in an emergency situation. The video below demonstrates that this filter works wonderfully. This filter can be washed and reused for up to 3 years.
It can also extend the life of an expensive water filter by using it as a pre-filter before you run the water through the expensive filter.

Take a plastic empty water bottle that has a smooth neck (highly recommended) and cut off the bottom. Find or buy an article of clothing that is made of 100 percent polyester non-stretchy tight weave fabric. Cut it into 2 inch to 3 inch strips. Get the polyester a little damp and role it into a roll. Make each layer snug but not too tight (If you stretch the fabric, the holes increase in size making it a less effective filter). Make the diameter of the roll big enough to insert into the water bottle. It needs to form a fairly tight seal against plastic.

Then you pour the water into the bottom of the water bottle where you cut it off and it will filter through the fabric and out the top part of the bottle.

If the water has a large amount of sediment, you can do 2 water bottles one on top of the other.  You can also put a layer of charcoal between the 2 bottles to eliminate bad odors or odd taste of the filtered water.

The water should have the appropriate amount of bleach, four drops per quart added or heat to a rolling boil (think of the ever-useful survival saying “big bubbles, no troubles”) to ensure that all of the organisms have been killed.


Monday, October 3, 2016

Kill virtually anything in 10 to 20 minutes using Acidified Diluted Bleach

In an emergency situation cleanliness is more important than ever. Hospitals will be overflowing. You can't afford to get sick. Endospores can survive without nutrients. They are resistant to ultraviolet radiation, desiccation, high temperature, extreme freezing and chemical disinfectants.

The American Society for Microbiology did a study that shows Vinegar increases the killing power of bleach. "Diluted bleach at an alkaline pH is a relatively poor disinfectant, but acidified diluted bleach will virtually kill anything in 10 to 20 minutes," says Norman Miner, a researcher on the study. "In the event of an emergency involving Bacillus anthracis spores contaminating such environmental surfaces as counter tops, desk and table tops, and floors, for example, virtually every household has a sporicidal sterilant available in the form of diluted, acidified bleach."

Miner and his colleagues compared the ability of alkaline (pH 11) and acidified (pH 6) bleach dilutions to disinfect surfaces contaminated with dried bacterial spores, considered the most resistant to disinfectants of all microbes. The alkaline dilution was practically ineffective, killing all of the spores on only 2.5 percent of the surfaces after 20 minutes. During the same time period the acidified solution killed all of the spores on all of the surfaces.

Miner recommends first diluting one cup of household bleach in one gallon of water and then adding one cup of white vinegar.

So in addition to storing water and bleach for emergencies I suggest you also store vinegar.
These three items will allow you to effectively keep all surfaces clean and sanitary thus eliminating the risk of sickness.

Source:


Sunday, September 25, 2016

Solar Panel Alignment Tool

Those of you who came out to see us at the preparedness expo last week may have seen this.
Many know that solar panels are highly sustainable and completely renewable.
Being able to harness power from the sun, especially in emergencies is an excellent alternative power source. Those who do use solar panels should always aim to get the most energy they possibly can.

You can buy solar alignment tools that use shadows but I thought I could make one for free.
My first design worked perfect with no problems. It is a simple concept really. The suns rays are hitting the earth fairly straight. If the sun was exactly over a persons head your shadow would be around your feet. The more angle of the sun the longer your shadow is.

 I use this tool on my solar panels all the time. Once you align it perfect with the sun your voltage increases. The more it is out of alignment the more your voltage decreases. I connect my solar panels to batteries and then I have my inverter connected to the batteries so I can convert DC power to AC power.

The idea behind this is to find the best angle for the sun to hit the panel. You may be asking when to use this. . . the answer is simple, you choose. Generally, the more precise the angle, the more energy. Oftentimes, people set the panel’s angle at noontime, then move it a couple weeks later as the sun moves.

Solar Panel Alignment Tool
How to:
  • Find an old clipboard or a thin piece of plywood, drill a ¼ in hole in the center
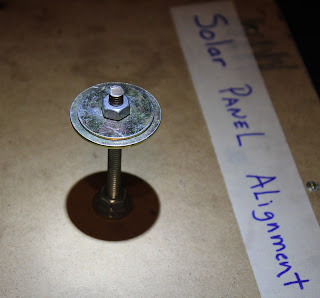
  • Put 1/4x3in bolt through hole and secure with washers and nuts
Solar Panel Alignment Tool Bolt
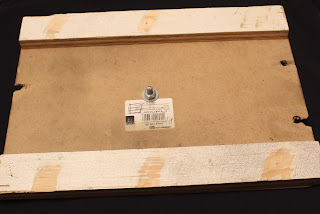
  • On the backside put ¾ in boards on two edges
Solar Panel Alignment Tool Bottom

To use:
  • Lay flat on the face of your solar panel
  • Move the panel until the shadow of the large washer is directly underneath it (as shown), this is the perfect angle at that precise time! (NOTE: The first photo shown is out of alignment)
Solar Panel Alignment Tool Aligned


Saturday, September 17, 2016

Preparedness Expo

Thanks to all those who came out to see us last Saturday!

Please check our website often as we will be adding new things all the time!

Please leave us a comment if you have questions about anything!

We are all about getting prepared for emergencies, Redneck style!


Friday, September 16, 2016

Do-it-Yourself Fire Starters

One of the many problems people might have in a natural disaster emergency situation is how to cook or provide heat. This idea for this first came from my friends son who helps at the preparedness fairs. It is an easy way to make fire starters using items everyone probably has in their home. These light easily and burn really well.

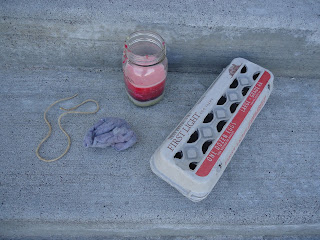
Do It Yourself Fire Starter Items


Items Needed:
- Lint from your dryer
- Used cardboard egg carton
- Small rope or twine
- Wax (I used the leftover wax from my wax 
   warmer. I just dump it into a jar after the smell
   is used up.)


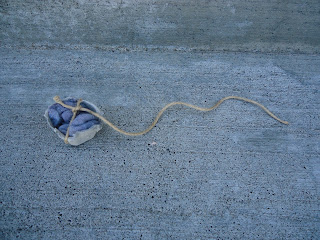
The first step is to cut off one section of your egg carton.
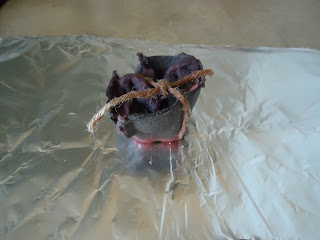
Then stuff it with lint and tie your rope or twine around it.
Egg Carton, Lint, and Twine

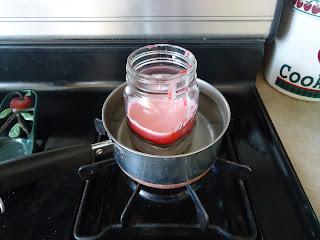
Next you need to heat up your wax. I did this by placing my jar of used wax in a pan of hot water.
The wax helps hold everything together and also provides more fuel for a longer burn.
Melting the Wax

Once the wax is melted just dip your egg carton section in the wax (you may need to push it down with a fork so the entire thing gets covered in wax. Then set it on a piece of tin foil to dry. One its dry you can cut the rope/twine to make a small wick.
Finished Fire Starter

And there you go.
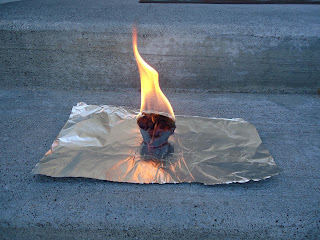
Just light the wick (string) and it will burn for approximately 15 minutes.
Quick, easy, cheap, and best of all, it works!!
Burning Fire Starter


Monday, September 12, 2016

Losing Everything List

Source:http://prepforshtf.com/natural-disaster-preparedness/Imagine you are traveling out of town and a major disaster happens. You need to get home by foot or car and don't have many resources. Keep this list in your suitcase when you travel so you will know, if disasters arise, the items you need to find to help you get home.

Losing Everything List: 
- Road Atlas
- Compass
- Pot with lid
- Large spoon
- Bleach-4 drops per quart of water (let sit for 30 min)
- Food
- Water and water container
- Tarp
- Garbage bags
- Blanket/sleeping bag etc.
- Backpack or bag
- A change of clothes, coat, good shoes
- Towel
- Knife
- Matches/lighter
- Flashlight and extra batteries
- Cell phone and charger
- Toilet paper
- Hand sanitizer
- Medicines/first-aid items
- Wallet/Money/Barter Items (cigarettes, alcohol)
- Hand tools (crescent wrench, screwdriver, pry bar etc.)
- Small rope at least 200 feet
- Sunglasses
- Swimming googles and a painters respirator (for dust and smoke protection) 
- Hose, Funnel, Gas can, Philips screwdriver (Sharpen Philips screwdriver to a point. When
  you find abandon vehicles pound a hole with pointed screwdriver into gas tank and capture
  gas with funnel, hose, and gas can. This might be your only way to get fuel.)
- Well Pipe no bigger than 1 1/2 inch outside diameter (You can take a copper or steel pipe
  about 2 feet long (plastic pipe is too light to sink itself without adding weight) and plug one
  end, tie a rope on the other end, take well cap off and lower it down into the well until you
  submerge it in water, then pull it back out to fill your jug. There are about 16 million wells in
  USA.)


Wednesday, August 31, 2016

Active Shooter Bag - August Idea of the Month

Active Shooter Bag
Guest Post by Dan Vernon

** Disclaimer:  It is illegal to use deadly force in the commission of a crime.  Please check your local, state, and federal laws in regards to the use of lethal force.  The contents of this kit is one opinion and is not a guarantee that you will win a lethal force encounter.  This kit is meant to create an active thought process in the good law abiding citizens of this country.  These items will not be affective unless you receive formal training and educate yourself into the proper use. **

General Description:  A kit equipped with the gear needed to effectively combat an armed conflict and/or anytime lethal force is legally justified.

There are several tiers to an Armed Response Kit (ART).
However, today we will discuss the very first tier of an ART, the Active Shooter Bag (ASB).

The ASB is a small, lightweight bag that will provide the basic essential gear to assist a person in surviving an active shooter incident and/or a home invasion.  This also applies to any armed attack from a person with the intent to kill or seriously injure you or others. 
It should contain the following items:  Bag, Handgun, Ammunition, Trauma First Aid, Flashlight, and a quality knife.  Below is a breakdown and description of each item.


The Bag:  The bag needs to be small but large enough to hold the contents adequately.  I prefer a bag that is an ‘over the should’ type bag, this allows a person to throw the bag over the shoulder even if you jump from be in your underwear.  A fanny pack would also work as well.  The color of the bag should be subdued, but avoid camouflage bags, they can draw unwanted attention if deployed in public.  A small bag of this style allows a person to have all of the basic items at all times (ex. hanging on a bed post, or in a desk drawer, or in your car).

The Handgun:  I recommend a handgun simply due to the need to be concealable within your ASB bag.  As big of a handgun as you can carry in the bag without effecting sensible carry of the bag.  Whatever type of handgun a person chooses, they should be trained and proficient with that firearm.  The firearm should have place inside of the bag that it is stored securely and cannot fall out during a drop.  Also nothing else should be stored in that pocket.  Many bags have a built in holster system that will fit your firearm.

The Ammunition:  The amount of ammo is a difficult detail to provide, I prefer to have as much as possible.  However, ammo will begin to add noticeable weight to the bag.  In my personal bag I carry two spare 17 round magazines.  If your handgun carries fewer rounds then you may decide to carry one more magazines.  Those individuals that carry a revolver should have the ammo organized in the best way possible, like speed strip and speed loaders.  Loose rounds in the bottom of the bag are not a good idea, they will not be easy to locate during the high stress of a lethal force encounter.  Stock this bag with high quality defensive ammo, this stuff will be defending your life!
The Trauma First Aid:  Think about the injuries associated with a lethal force encounter; stab wounds, gunshot wounds, and severe cuts.  The most common cause of death during an event like this is a person bleeding to death before help arrives.  During my years of tactical training we were taught that 80% of all gunshot victims survive, this is due to modern medicine.  If the Paramedics are held up because the police have not yet cleared the entire building, many people could simply bleed out.  Stock your bag with tourniquets, compression bandages, Israeli battle Dressings, gauze, gauze rolls, and tape.  Please do not forget to place protective medical gloves, several sets, in your bag also.  A couple of useful blood stopping items that are cheap and easy to acquire are tampons, maxi pads (the overnights), sports wrap tape, horse leg wrap (same stuff used for humans but half the price).  The thing with this medical kit is it should be save for yourself until the incident is over and then you can help those in need.  The reason for this is you will be equipped to stop the bad guy, if you don’t treat yourself, you will not be helping anyone.
The Flashlight and Knife:  These two items are tools needed to fight, escape, and treat the injured.  The flashlight should be a small quality light with a tail cap and a wrist lanyard.  Learn how to fight with a light and learn how to have light discipline, which could also save your life and give you the upper hand.  The knife is a great tool to cut your way through many obstacles, cut off clothing of the injured, and in a last resort fight!  Buy knife that has the ability to open and close with one hand, I like medium to large folding knifes.

The most important thing about this bag is that you educate yourself on the proper techniques to use all of the items in the bag.  Each person may find other tool to add to this list, which is okay, just keep it light as possible.  Tools like extra medical items, a phone, extra batteries, a list of important phone numbers, thin gloves, small bottle of water, and energy bars could all be a viable addition.  This bag is meant to give you a fighting chance.  If you are not a gun person, then stock medical and escape/evasion gear, just give yourself the gear needed to overcome a lethal force encounter.
And one more thing, when the police do arrive do EXACTLY what they say!  Drop the gun, and put your hands in the air, don’t argue, and don’t make any fast movements.  This type of incident is stressful for even the most highly trained individuals, if you do not obey their commands you will get shot.  This ASB allows you to take action or be a good witness, you do not have to run from a safe place to join the fight.  I can guarantee that I will never get mugged in a dark alley, because I don’t walk down dark alleys.  The best action is to stay as far away from danger as possible.  However, when evil shows its face, this bag will give you options that you wouldn’t have otherwise.

Be safe, love your fellow man, and never stop learning.


Wednesday, July 13, 2016

Survival Cache - July Idea of the Month

_______________________________________________________________________________
Survival Cache                                                                          [kash]
             (noun)
A buried or hidden container that is filled with supplies that can be accessed when needed.
Often placed on someone’s property hidden via burying. They are also placed along evacuation/bug out routes to be accessed when needed during traveling.
_______________________________________________________________________________

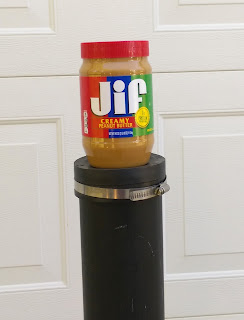
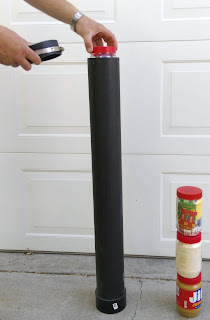
This survival cache is a perfect way to store needed items in a safe, hidden location. These can be accessed at any time but mainly used for natural disaster situations. Some of the things I put in mine are ammo, dried food, water purifying tablets, medication, a good pocket knife, flint and steel, solar blanket, rope, an empty soup can for boiling water, etc. If for some reason you lost everything and you had a cache somewhere you would have access to some basics with a long shelf life. I have a couple buried. One at the corner of a shed at a friend's house and one on another property. They seal real well since this pipe is made to go into the ground and not leak. You can buy the 4 inch ABS pipe and parts at Home Depot or Lowe's or a plumbing store.

Survival Cache for Emergency Situations

Supplies needed (makes 1 cache):
• 4 inch diameter ABS plastic pipe [you choose length]
• ABS glue
• ABS 4 inch cap [to glue on bottom]
• ABS 4 inch cap [removable to make the top]
• Flathead screwdriver
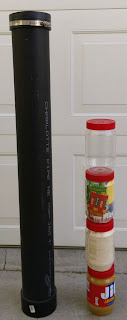
• Empty 40 oz. Jif peanut butter plastic jars {Note: I’ve found these work perfectly - flat on top and bottom for stacking, they seal real well, good for a second barrier, not too tight or too loose in the 4 inch pipe, they keep things separated, and you have extra containers for water or whatever things you need }
 How to:
1. Glue a cap on one end of the pipe
2. Fill jars with your survival products
3. Put top cap on (the removable one) and
    tighten with a screwdriver
4. Bury in a safe location. I like to bury them
   vertical, but some like horizontal; it is your preference.

Survival Cache assemblySurvival Cache Containers

I like digging a vertical hole a little bigger than the pipe. Then I set the pipe in the hole and stuff some foam around it to fill the hole. Then I have a small piece of plywood about 12x12 inch that I recess into the soil on top of the hole about 8 inches. I then put dirt on top of plywood so I don't have to dig much to get it out. In an emergency I would dig it up and take the whole thing with me. I could use the pipe for an extra container or something.
I hope this cheap, redneck emergency preparedness idea is useful for you!


Monday, June 6, 2016

Easy Soup Base - June Idea of the Month

After a natural disaster or during an emergency situation, food can be scarce.
Knowing how to make the small amount of food you might have available,
 into something good to eat is essential.

For an easy soup base take a gravy packet and double the water that it calls for.
We like McCormick gravy, it calls for 2 cups cold water so we add 4 cups of water (if you like the soup thicker: only add 3 cups of water to 1 McCormick’s gravy packet).
 Then, add salt to make up the difference for the extra water. Next, add some canned beef, canned corn, and canned baby potatoes. Finally, stir until the soup is at a low boil.
This soup is really great and very easy to make! Try it!


Friday, May 20, 2016

Chicken Cooker - May Idea of the Month

Chicken Cooker
Making slow-cooked, smoked meat/potato wedges etc. is nearly effortless with this method of cooking.
Meadow Creek, a barbecue website, crafts chicken cookers that make it possible to easily cook incredibly delicious chicken
To view these “BBQ Pits” go here: http://www.meadowcreekbbq.com/bbq-series.php
I decided to make a small version of their type of cooker for everyday home use and camping. It worked really well!

The concept:
·    The steel box encases the contents (briquettes, grates, food items). This serves to keep  
     heat inside the cooker and speed up the cooking process.
·    The food is heated by briquettes in the bottom of the box. Note: DO NOT use briquettes 
     with lighter fluid, use only plain briquettes. A briquette chimney is used to initially heat
     these.
·    Small vent holes feed briquettes oxygen, but you must be careful to not give it too much
     oxygen or your chicken will burn. I put six quarter-inch holes on the sides close to the
     bottom of the box.
·    The meat is sandwiched between two grates
·    The distance of the two grates is 18 inches from the briquettes (this measurement is very
      important!)

My box is 16x16 x22 H. The two racks are hinged together on one side.
I used an oven rack [the kind with the bars close together, then I cut it to the size I needed]. I used a slip ring ( just 2 little pipes welded together ) to hold the rack together but you could use wire or a hose clamp etc. I made the box by welding cut steel together. You could use 2 oven racks and some cinder blocks if you couldn't weld. You just need some type of fireproof box.   
How to:
1.   Obtain a 7 lbs pack of bone-in chicken, I prefer thighs. Lay them on one rack and close other rack on top of them, clamp the non-hinge side. This makes a “sandwich”, season both sides with your choice of spices.


2.    Light two chimney’s worth of briquettes
3.    After 30 minutes, dump them in the bottom of box/cooker.
4.    Level the briquettes out with a shovel

5.    Set rack of preloaded chicken in slots (located at the top of the cooker)


6.    Shut the lid of the cooker 
7.    For crispy chicken: Flip every 10 minutes for an hour and twenty minutes


8.     For less crispy chicken (regular): Flip every 10 minutes for an hour and ten minutes


9.     Remove chicken grates from cooker, set in a safe place


 Once the chicken is done, there is plenty of heat left over in the bottom of the cooker for use in Dutch oven cooking, or for cooking baked potatoes etc.


Friday, April 1, 2016

Personal Safety - April Idea of the Month


Personal Safety

Have you ever worked in the rain without a raincoat or been out in a snow storm that you weren't ready for? Have you then had to clean up a muddy mess?

Having the right gear and clothing for the situation you are in is so important. I milked cows through out my teenage years and remember many times getting so dirty and so wet working with those cows. It was miserable. One summer I got so wet that I ended up getting pneumonia and spent a few days in the hospital. Back then they put a tent over the bed for pneumonia patients and I remember having to keep straightening the plastic tent so I could watch tv through the plastic. Funny what we can remember from so long ago.

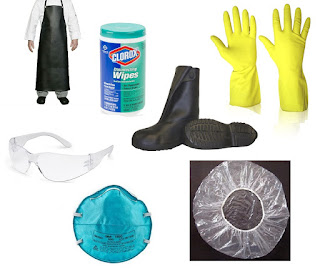
Because of those memories I have realized how important it is in emergency situations to insure safety by having the right gear and protective practices. Having the things you need for personal protection provides a way to keep from cross contamination of sickness or food illnesses. It’s good to have waterproof personal protective equipment for things like cleaning up from sick kids, going in a quarantined room, butchering meat, canning etc. Waterproof equipment is also easy to sanitize with sanitizing wipes, bleach water, paper towels etc. Below is a list I have compiled of items to help you be prepared with the right gear for personal safety.

Personal Safety Items for Emergency Situations
Equipment needed for personal safety: 

  • Heavy duty vinyl waterproof apron(s)
  • Rubber over-boots
  • Shower cap(s)
  • Rubber gloves
  • Safety glasses
  • Mask(s)
  • Sanitizing wipes

Photo credits:
http://g01.a.alicdn.com/kf/HTB1GkgUKpXXXXaoXFXXq6xXFXXXU/Waterproof-Home-font-b-Shower-b-font-Bathing-Elastic-font-b-Cap-b-font-Disposable-font.jpg


Tuesday, March 1, 2016

Emergency Suitcase - March Idea of the Month

Instead of having an empty suitcase in your closet, pack your suitcase as if you were going on a trip, with some extra clothes, bath kit, and some cash.

In case of a family, medical, or natural disaster emergency, you can grab-and-go on a minute's notice.
For example, if you had a family emergency out of town, you could grab your emergency suitcase and be on your way.  

It also helps to know your blood type, in case a family member/friend needs a blood transfusion.


Saturday, February 13, 2016

Emergency Toilet Paper - February Idea of the Month

Toilet Paper is something you might not consider storing for emergency situations.
But running out of toilet paper can become an emergency situation!!
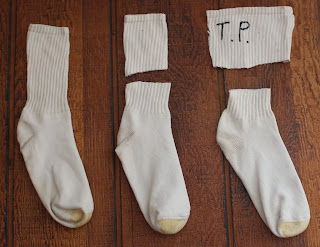
In an emergency, you can take off your sock(s), cut the top part(s) off with your pocketknife, and use it for toilet paper.
Make sure to leave some elastic band on your socks to keep it on your ankle.

Emergency Toilet Paper


Tuesday, January 19, 2016

Carbon Monoxide (CO) Can Kill

Carbon monoxide (CO) is produced when a fuel such as charcoal, gas or petrol burns incompletely.
 
This could be because an appliance isn’t working properly or might simply happen as part of its normal function. Barbecues, for example, produce carbon monoxide even when they are working well.
 
Carbon monoxide is a colourless, odourless gas and is poisonous. In high concentrations it can kill swiftly. In smaller concentrations CO poisoning can give symptoms similar to flu or food poisoning. Look out for headaches, nausea and vomiting, dizziness, drowsiness and weakness - but the best advice is to avoid any chance of being poisoned in the first place.
 
Be careful when burning any type of fuels in an emergency.
Having a battery operated CO detector can be a life saver.


Thursday, January 7, 2016

Tire Rim Stove - January Idea of the Month

Cooking and heating in emergency situations is very important. If you don't have the means to purchase a stove or propane to store for emergencies or if a disaster has already happened and you are scrambling for something, here is another option.
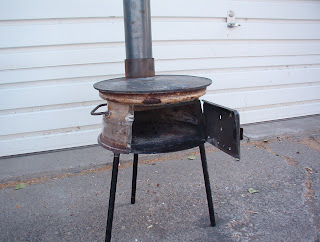
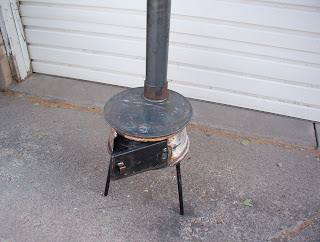
You can make a small wood stove from a 16 inch truck tire rim and whatever other metal pieces you can find.  
*Some welding is required*
Cut the center out of the tire rim.
Weld a round steel plate to the top and bottom of the rim
Add metal legs to the bottom.
Cut the door out of the side of the rim.
You can use the piece you cut out or a different piece of metal for the door. 
Add hinges and a handle to the door piece. 
Cut a hole in the top and add the exhaust pipe.
       There you have a stove you can use for heating your shelter.
Tire Rim Stove

Emergency Heating Option